EN
EN
 AR
AR
 BG
BG
 HR
HR
 CS
CS
 DA
DA
 NL
NL
 FI
FI
 FR
FR
 DE
DE
 EL
EL
 HI
HI
 IT
IT
 JA
JA
 KO
KO
 PL
PL
 PT
PT
 RO
RO
 RU
RU
 ES
ES
 SV
SV
 CA
CA
 TL
TL
 ID
ID
 LV
LV
 SR
SR
 VI
VI
 GL
GL
 TH
TH
 TR
TR
 AF
AF
 MS
MS
 GA
GA
 AZ
AZ
 BN
BN
 LA
LA
 MN
MN
 NE
NE
 KK
KK
 UZ
UZ

Technical Support | Detailed Explanation of the Hand Lay-up Fiberglass Forming Process
Aug.05.2025
I. Spraying and Brushing of Gel Coat
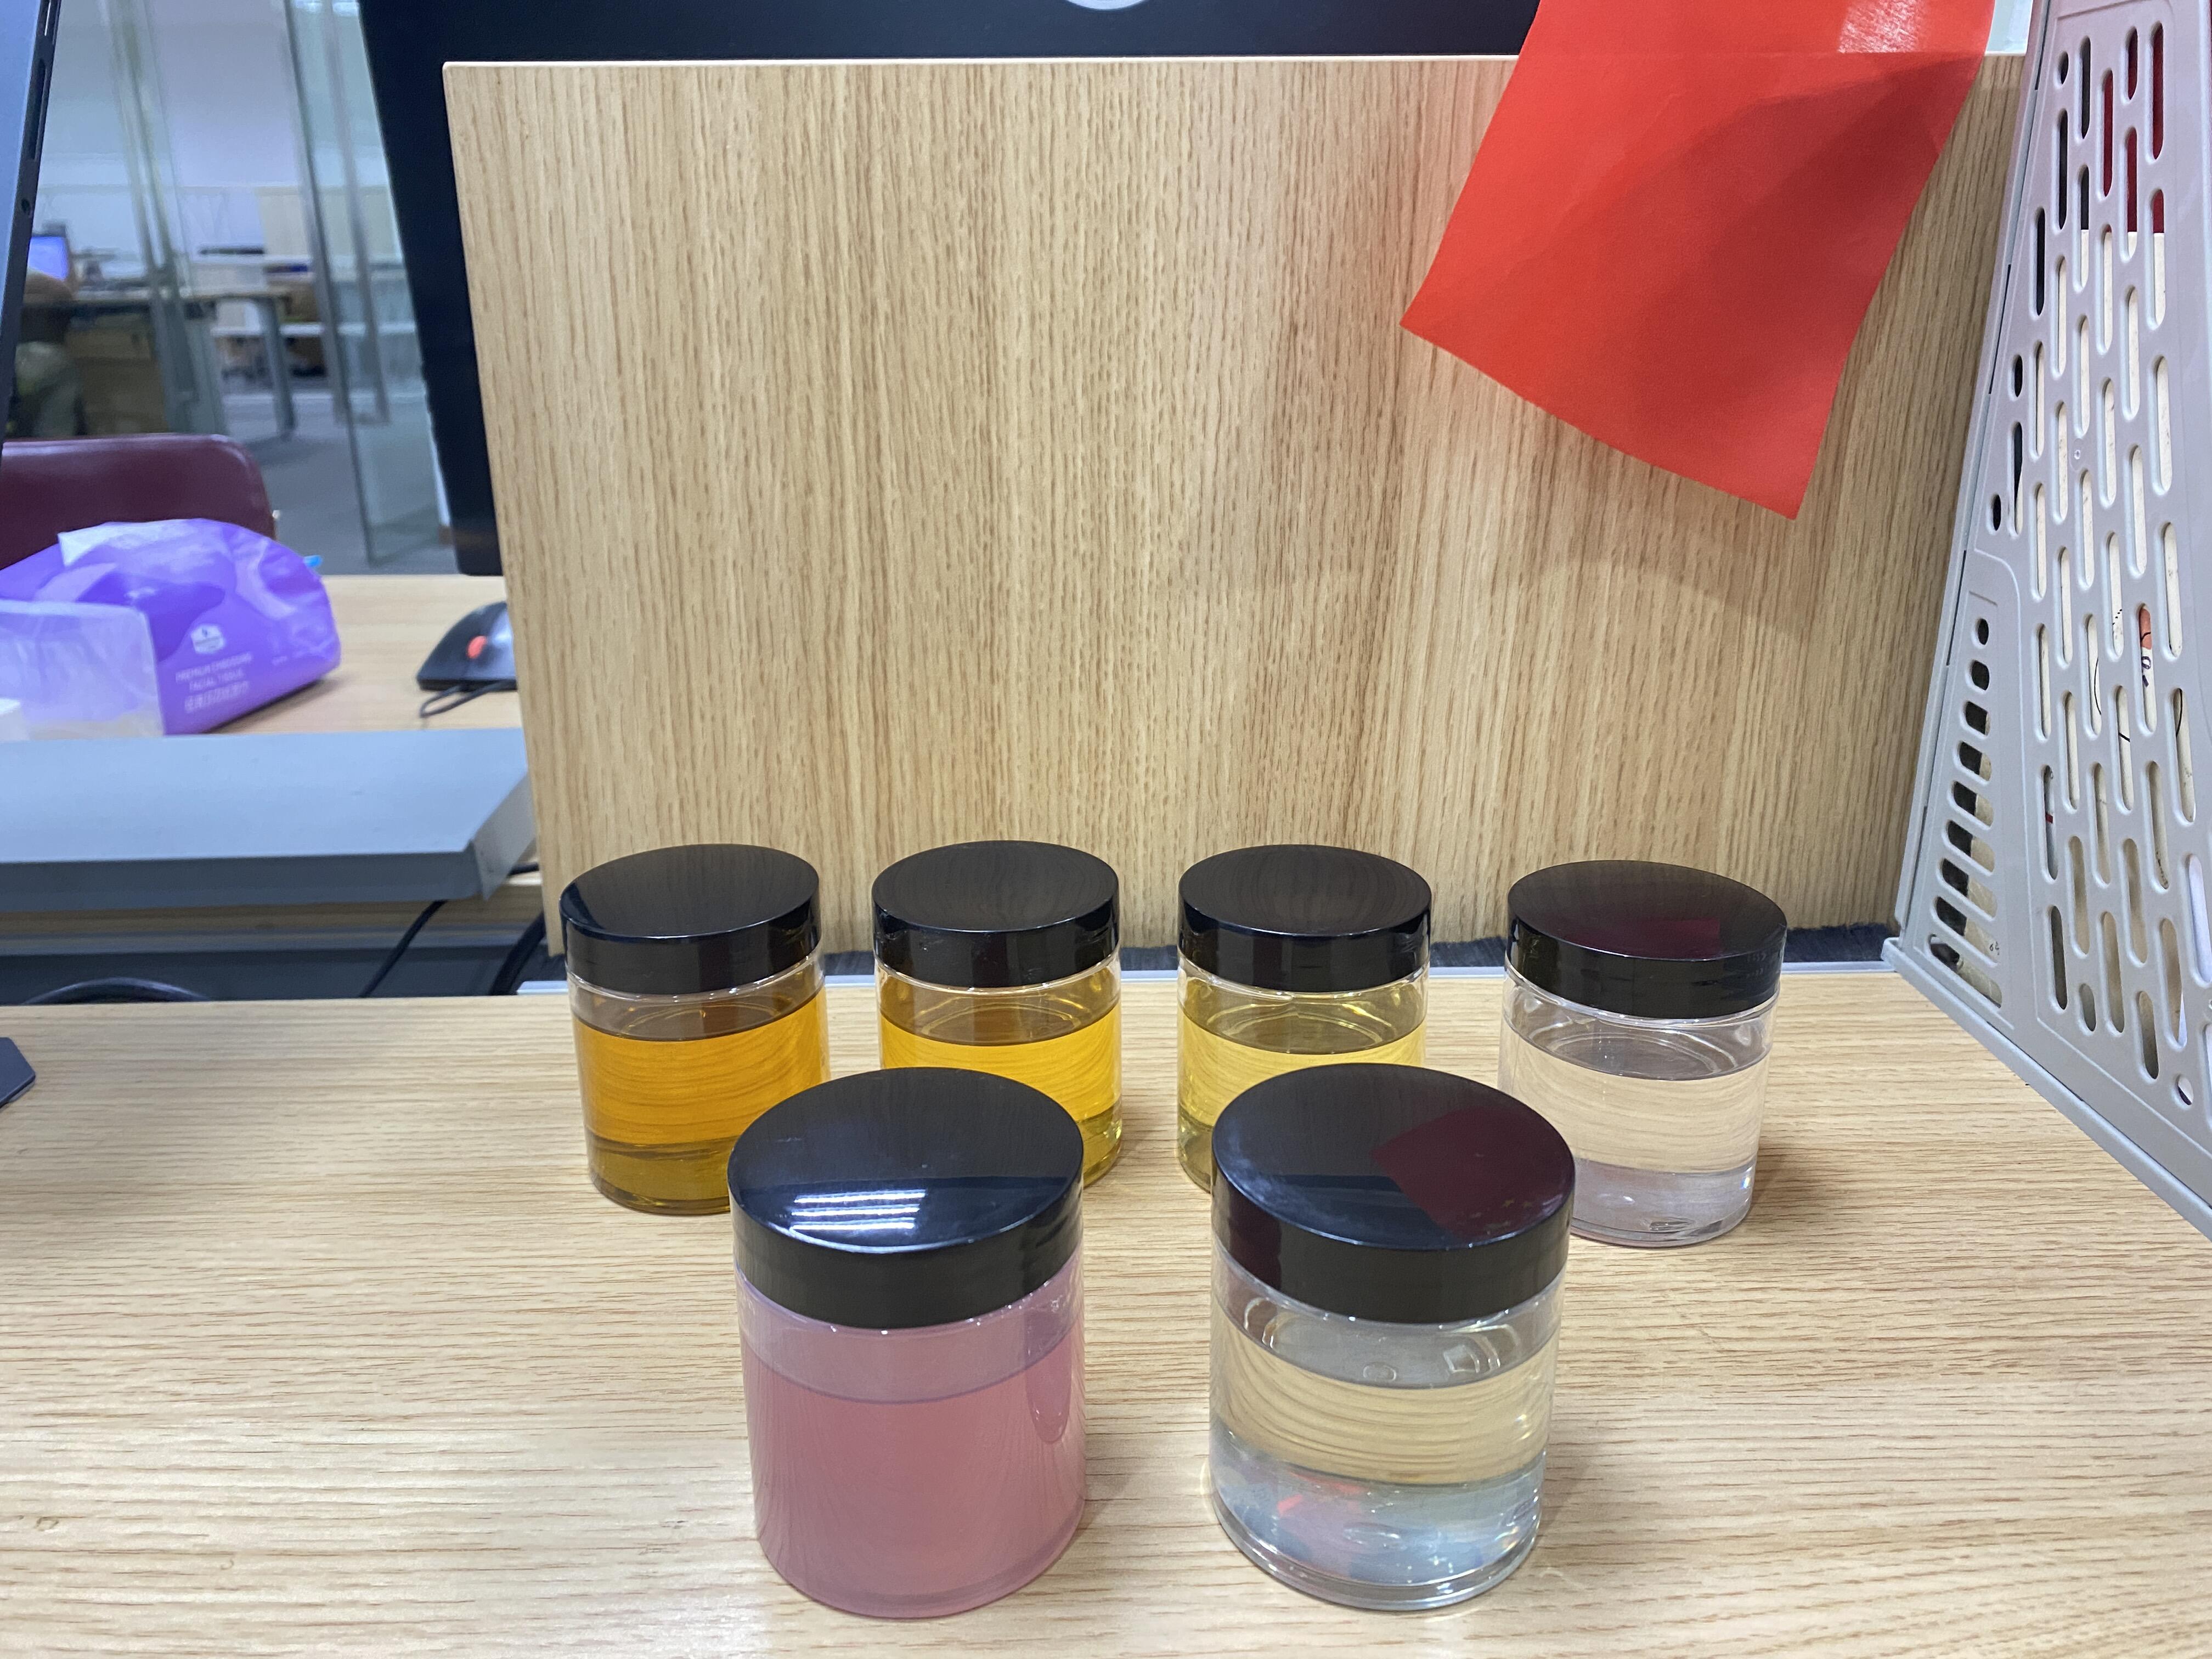
To improve and beautify the surface condition of FRP (Fiber Reinforced Plastic) products, enhance their value, protect the inner FRP layer from erosion, and extend the service life of the products, we usually form a gel layer with high resin content, mixed with pigment paste, on the working surface of the products. This layer can be pure resin or reinforced with a surface mat, and is called the gel coat layer (also known as the surface layer or decorative layer). The quality of the gel coat layer directly affects the appearance quality, weather resistance, water resistance, and resistance to chemical medium erosion of the products. Therefore, the following points should be noted when spraying or brushing the gel coat layer:
(1) When preparing gel coat resin, thorough mixing is required, especially when using pigment paste. Uneven mixing will cause spots and streaks on the product surface, which not only affects the appearance but also reduces its physical properties. For this reason, mechanical stirring should be used as much as possible, and preferably a mixer that does not generate vortices to avoid introducing air.
(2) The gel coat can be applied with a brush or a special spray gun. During spraying, 5-7% styrene should be added to adjust the viscosity of the resin and compensate for the styrene lost through volatilization during the spraying process.
(3) The thickness of the gel coat layer should be accurately controlled between 0.3-0.5mm, usually controlled by the mass of gel coat used per unit area, i.e., the dosage of gel coat is 350-550g/㎡, which can achieve the above-mentioned thickness requirements.
The thickness of the gel coat layer should be appropriate: it should not be too thin, nor too thick. If the gel coat is too thin, it may cure incompletely, and the glass fibers on the back of the gel coat may be exposed, affecting the appearance quality and failing to beautify and protect the FRP product. If the gel coat is too thick, it is prone to cracking and poor impact resistance, especially unable to withstand impacts from the reverse direction of the product. Uneven brushing of the gel coat can also easily cause cracks during demolding, due to internal stress in the resin caused by uneven surface curing speed.
(4) The gel coat should be applied evenly, and local accumulation of the gel coat should be avoided as much as possible.
(5) The curing degree of the gel coat layer must be properly controlled.
The best way to check if the gel coat layer is properly cured is the touch method: touch the surface of the gel coat layer with a clean finger. If it feels slightly tacky but not sticky to the touch, it indicates that the gel coat layer has basically cured, and the next lay-up operation can be carried out to ensure the integrity of the gel coat layer and the backing layer.
II. Determination of Process Route
The process route is related to product quality, product cost, production cycle (production efficiency), and other factors. Therefore, before organizing production, a comprehensive understanding of the technical requirements during product use (environment, temperature, medium, load, etc.), product structure, production quantity, and construction conditions must be obtained. After analysis and research, the molding process plan can be determined. Generally, the following aspects should be considered:
(1) According to the product use requirements, reasonably select raw and auxiliary materials, formulas, and lay-up methods.
(2) Determine the mold structure and mold material according to the product's geometric shape and production quantity.
(3) Determine the curing method according to climatic conditions and the urgency of the task.

III. Main Contents of Process Design
(1) Select appropriate materials (reinforcing materials, structural materials, and other auxiliary materials) according to the technical requirements of the product. When selecting raw materials, the following aspects should be mainly considered:
① Whether the product is in contact with acidic or alkaline media, including the type, concentration, service temperature, and contact time of the medium.
② Whether there are performance requirements such as light transmittance and flame retardancy.
③ In terms of mechanical properties, whether it is dynamic load or static load.
④ Whether there are anti-leakage and other special requirements.
(2) Determine the mold structure and material.
(3) Selection of release agent.
(4) Determine the resin curing formula and curing system.
(5) According to the given product thickness and strength requirements, determine the type, specification, number of layers, and lay-up method of the reinforcing materials.
(6) Formulate the molding process regulations.
IV. Lay-up of FRP Layers
Lay-up is an important process in the hand lay-up molding process. It must be operated carefully to ensure speed, accuracy, uniform resin content, no obvious air bubbles, no poor impregnation, no damage to fibers, and a flat product surface, so as to ensure product quality. The quality is greatly related to the operator's proficiency and work attitude. Therefore, although the lay-up work is simple, it is not easy to lay up products well, and it should be taken seriously.
(Ⅰ) Thickness Control
The thickness control of FRP products is a technical issue encountered in both the design and production process of hand lay-up technology. When the required thickness of a product is known, calculations need to be carried out to determine the resin and filler content, as well as the specification and number of layers of the reinforcing materials used. Then, the approximate thickness can be calculated according to the following formula:
t=(G1n1+G2n2+……)×(0.394+0.909k1+0.4×k1k2)
Where:
t — calculated thickness of FRP (mm);
G1, G2 — areal mass of various specifications of cloth or mat (kg/㎡);
n1, n2 — number of layers of various specifications of cloth or mat;
0.394 — thickness constant of fiber base material;
0.909 — thickness constant of polyester resin;
0.400 — thickness constant of filler;
k1 — ratio of resin content to glass fiber content;
k2 — ratio of filler content to resin content.
(Ⅱ) Calculation of Resin Dosage
The resin dosage of FRP is an important process parameter, which can be calculated by the following two methods:
(1) Calculate according to the principle of void filling, derive the formula for gel content. As long as the areal mass and equivalent thickness of the glass cloth (the thickness of the product equivalent to one layer of glass cloth) are known, the gel content of FRP can be calculated.
(2) Calculate by first determining the product mass and then the mass percentage of glass fiber:
① Product surface area × thickness × density of fiber-reinforced plastic = product mass;
Product mass × mass percentage of glass fiber = mass of glass fiber;
Product mass - mass of glass fiber = mass of resin.
① Product surface area × thickness × density of fiber-reinforced plastic = product mass;
Product mass × mass percentage of glass fiber = mass of glass fiber;
Product mass - mass of glass fiber = mass of resin.
② Product surface area × number of glass fiber layers × areal mass of glass fiber = mass of glass fiber;
Mass of glass fiber ÷ mass percentage of glass fiber = product mass;
Product mass - mass of glass fiber = mass of resin.
Mass of glass fiber ÷ mass percentage of glass fiber = product mass;
Product mass - mass of glass fiber = mass of resin.
The resin dosage required for lay-up can be estimated based on the mass of glass fiber. If chopped strand mat is used, its gel content is generally controlled between 65-75%; if glass cloth is used as the reinforcing material, the gel content is generally controlled between 45-55% to ensure product quality.
(Ⅲ) Lay-up of Glass Cloth
For products with a gel coat layer, no impurities should be mixed into the gel coat. Before lay-up, pollution between the gel coat layer and the backing layer should be prevented to avoid poor interlayer adhesion, which affects product quality. The gel coat layer can be reinforced with a surface mat.
During lay-up, attention should be paid to the impregnation of glass fibers with resin. First, make the resin infiltrate the entire surface of the fiber bundles, and then completely replace the air inside the fiber bundles with resin. It is very important to ensure that the first layer of reinforcing material is completely impregnated with resin and closely bonded, especially for some products to be used under higher temperature conditions. Because poor impregnation and bonding will leave air around the gel coat layer, and this residual air will expand due to heat during product curing and use, resulting in bubbles.
During lay-up, first, evenly brush a layer of prepared resin on the gel coat layer or the mold forming surface with hand lay-up tools such as brushes, scrapers, or impregnation rollers, then lay a layer of cut reinforcing material (such as diagonal strips, thin cloth, or surface mat), and then use forming tools to brush it flat and press it tightly to make it fit closely. Attention should be paid to removing air bubbles to fully impregnate the glass cloth. Do not lay two or more layers of reinforcing materials at the same time. Repeat the above operations until the designed thickness is reached.
If the geometric dimensions of the product are relatively complex, and the reinforcing materials cannot be laid flat in some places, and bubbles are difficult to remove, scissors can be used to cut the place to make it fit flat. It should be noted that the cut parts of each layer should be staggered to avoid strength loss.
For parts with a certain angle, glass fibers and resin can be used for filling. If some parts of the product are relatively large, they can be appropriately thickened or reinforced with ribs in those places to meet the use requirements.
Due to the different fiber directions of the fabric, their strengths are also different. The lay-up direction and lay-up method of the glass fiber fabric used should be in accordance with the process requirements.
(Ⅳ) Lap Joint Treatment
Fibers in the same lay-up layer should be as continuous as possible, and random cutting or splicing should be avoided. However, due to limitations such as product size and complexity, it is difficult to achieve this. During lay-up, butt-joint lay-up can be adopted, and the lap joints of each layer must be staggered until the required thickness of the product is reached. During lay-up, use tools such as brushes, wool rollers, and bubble pressing rollers to impregnate the resin and exhaust air bubbles.
If the strength requirement is high, to ensure the strength of the product, the two pieces of cloth should be lapped with a lap width of about 50mm. At the same time, the lap positions of each layer should be staggered as much as possible.
(Ⅴ) Lay-up of Chopped Strand Mat
When using chopped strand mat as the reinforcing material, it is best to use impregnation rollers of different specifications for operation, because impregnation rollers are particularly effective in removing air bubbles from the resin. If such tools are not available and brushes need to be used for impregnation, the dot brushing method should be used to apply the resin; otherwise, the fibers will be messed up and displaced, resulting in uneven distribution and uneven thickness. For reinforcing materials laid in deep internal corners, if it is difficult to make them fit closely with brushes or impregnation rollers, they can be smoothed and pressed by hand.
During lay-up, apply the glue to the mold surface with a glue application roller, then manually lay the cut mat pieces on the mold and smooth them, then apply glue with the glue roller, roll back and forth repeatedly to make the resin glue infiltrate into the mat, then use a glue bubble roller to squeeze the glue in the mat out to the surface and exhaust air bubbles, and then lay the second layer. For corner areas, the mat can be torn by hand to facilitate wrapping, with a lap of about 50mm between two pieces of mat.
Many products can also adopt the alternating lay-up method of chopped strand mat and glass cloth. For example, fishing boats laid up by various Japanese companies use this alternating method, which is reported to produce products with good performance.
(Ⅵ) Lay-up of Thick-Walled Products
Products with a thickness of less than 8mm can be formed in one step, while products with a thickness greater than 8mm should be formed in multiple steps. Otherwise, poor heat dissipation during curing may cause the product to scorch and discolor, affecting its performance. For products formed in multiple steps, during the second lay-up, burrs and bubbles formed after the first lay-up and curing should be scraped off before continuing to lay the next layer. In general, it is recommended that the thickness of one-time forming should not exceed 5mm. Of course, there are also low-exotherm and low-shrinkage resins developed for forming thick-walled products, which can achieve a larger thickness in one-time forming.
Products with a thickness of less than 8mm can be formed in one step, while products with a thickness greater than 8mm should be formed in multiple steps. Otherwise, poor heat dissipation during curing may cause the product to scorch and discolor, affecting its performance. For products formed in multiple steps, during the second lay-up, burrs and bubbles formed after the first lay-up and curing should be scraped off before continuing to lay the next layer. In general, it is recommended that the thickness of one-time forming should not exceed 5mm. Of course, there are also low-exotherm and low-shrinkage resins developed for forming thick-walled products, which can achieve a larger thickness in one-time forming.